Cultural Expressions Project

This year for back to school, I decided that I wanted to focus more on learning and discussing my students’ special cultures. As an ancient world history teachers, culture is a major aspect of every unit we discuss, and often my 8th graders don’t know or consider what makes them, them. What their culture consists of. So after watching a few too many Little Einstein episodes this summer, I had an idea for a new project.

If you’ve watched Little Einsteins, then you’ve probably seen the episode where the kids help a baby totem pole find its family. For some reason, this little guy stuck out to me.. The LE fly to Alaska to learn about the Pacific Northwest Indian culture. The totem pole builds throughout the episode until it is with other totem poles. This idea of creating something that was a part of the culture to show other aspects of culture really appealed to me.

I created a PPT/PDF of the brainstorming process and overview of what I wanted my students to get out of this project. I ended up tweaking it over a few days, depending on what I was learning and hearing as teachers were preparing to go back to school.

I want to share that originally I planned to allow the students to use some of the cultures we learn about to inspire parts of their projects, but the more I looked into cultural appropriation, I decided to make the project focus 100% on the students’ lives. I’m going to attach the PDF copy here so you can see what it looks like and then I’ll explain how we went over it all in class.

culture expressions project

To start off, I had students create a working definition of “culture” at the front top of the page. {Since my students had an amazing geography teacher last year in 7th grade, most of mine had a pretty close definition}. After a few students shared their ideas, I explained the process of a word cloud. Normally for a word cloud, I let my students just word vomit on a specific topic, but I wanted this cloud to be more specific, so we did it together. I explained that I wanted to fill the board cloud and their clouds with aspects of culture. To get their brains working, I started with “Language.” I explained how language is like a category, and you can add your specifics. We wanted categories for the cloud. All of my classes did amazing coming up with aspects of culture. {Check out my instagram page for one of my class’s completed clouds}. Once they got rolling on ideas, they just kept discussing. It was awesome.

After solidifying plenty of aspects, students flipped the page over. I always have my students write due dates on their paper {I keep them all over my board, Remind101, and website too but, having them write I’m hoping, focuses their attention on the date. We then break down the project. We discuss how to pick 8 cultural aspects from the list and create a list of personal characteristics based on those topics. It was hard for many of them to distinguish between “favorites” and “part of their culture.” So I made a note in my lesson plan to think through this more next year before I teach.

Students are told they must have 8 characteristics, be on one of those aspects {couldn’t just be pictures on paper/poster/PPT}, they had to use one of their aspects as their “avenue” for presentation.

I ended up giving them 5 days to complete their project. That way, if they wanted to get some help, build a project, or had multiple activities, they could handle the workload.

Here’s my example I showed after my explanation:

culture

I made mine in PicCollage, and had more than 8, but I needed it to line up. I think a personal example helped a ton.

Here are some amazing student examples turned in this week:

I wanted to attach the PPT version in case you needed to maker personal changes to the info. The fonts were from dafont.com, KG Life is Messy and Geektastic. They’re free and from amazing font designers.

culture expressions project


Until next time,

IMG_4959

Back to School Paperwork

The Idea Is Not to Live Forever, but to

FRIENDS! It is back to school season. I’ve been working our Bridges program this week and soaking up the last few days of summer with my family. I’ve been slowly {very slowly} working on some back to school paperwork that I like to keep updated for every year. Some of these just came to me, others I’ve been working on or trying in my room for across the years.

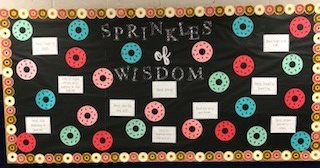
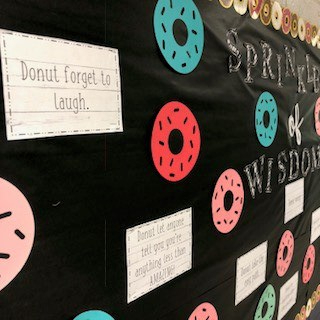
First off, here’s one that came to me after spotting some doughnut cut-outs on sale at Michael’s. They were ADORABLE and I just needed to build something around them. After scouring Pinterest, I came across a design that I loved and ran with it. Here’s the finished product:

donut2

donut

Get the free download of the board set here. Doughnut Bulletin Board Set


Next up is my makeup sheet. I post this sheet on the back wall of my classroom where my students line up. I plan to write major quizzes, tests, and projects on it. Classwork will be the students’ responsibility {otherwise this poster would be reprinted weekly}. I hot glue a sticky note pad next to it for students to write themselves reminders.

Check out my Make-up Poster here {with fonts by Math and Glitter}.


I also print off my bellringer sheet for each two weeks. We are required to have a bellringer at the start of each class. Usually I have a leading question or something to spark their thinking on the topic of the day. Feel free to change names and fonts on this one.

Bellringers page


& that’s it friends. Any feedback, feel free to leave in the comments!

IMG_4959

EDM 510 – Final Blog Reflection

I have so enjoyed my Educational Media class this summer semester. I love looking for and using new technology in the classroom, but I realized through many of these assignments that I have struggled to create a student centered focus with my integration of tech. We have shared many types of resources and ideas for how to use them in many types of classrooms. Below are some of my main takeaways from this summer semester.

Just try it.

One of my main takeaways is to just try the technology. Often times, as teachers, we come up with every excuse in the books. “Technology doesn’t always work. The students might not get it. They might misuse it. It might take too long. It’s too much work.” The list goes on and on. From this course, I’ve learned to just find one you think will work with your students and give it a go. If it doesn’t work out great, that is okay. That is part of being a teacher. We try new things, we attempt at making things better for our students, and if it doesn’t work, we try something else. I am excited to be able to have a plethora of resources to trial and error this year and learn what works best with this group of students.

Search for good resources and ask people.

For much of this class, our professor gave us a couple of resources to try for each assignment but encouraged us to search for other ideas as well. A lot of what I learned, I got from other students in the class. We were encouraged to collaborate and grow together throughout this course and that has made all the difference in my experience. One of my favorite assignments we did was an instructional strategies wiki where we collaborated with the entire class to share several apps, websites, and programs that could be used for different instructional strategies. This document will be an important one to continue referencing. If you are a teacher who struggles with technology and aren’t sure where to start, ASK. I enjoy playing around with apps and programs, and I love sharing this information with other teachers, helping them make their classroom better. When you plan to implement new technology in your classes, make sure to take the time to search for good tools. There are so many resources to help teachers help their students. There are endless accounts, blogs, and websites that update daily on new technologies to try in the classroom. Follow those accounts, read those blogs, and check those sites. That information will help you help your students, and save a ton of time!

Connect with other educators.

I think this sentiment goes without saying, but it is too important not to share. Like I said, one of the most important take-aways is to stay connected with other like-minded educators. Several of the assignments in this class asked us to reach out and connect with other educators and professional organizations. I enjoyed looking through the ISTE website and following along with teachers who attending their conference in June. I was able to attend NCSS conference in 2016, and I learned so much from all the educators and presenters in attendance. I also spend a lot of time looking through Twitter and Instagram with other teachers. So many teachers on social media sites share their experiences with technology and what works for them. Being able to connect and talk through activities, lesson ideas, and technology worries helps educators feel connected and able to try things on their own.

Ways I plan to use technology this year in my classroom:

One of the main ways I plan to implement more technology into my classes is to focus on more student centered projects based on technology. Much of what I’ve done in my class in the past has a teacher focused philosophy on education. After learning about many of the resources of this class, I want to be able to use more students centered activities based in technology this year. I really want to implement some video production projects into my class, whether it be content based projects or school involvement projects. I know my students are already using video technologies on their phones, and after learning about some editing and sound programs through this class, I’d like to work on those skills with my students.

I would also like to include more storytelling and podcasts in my classroom. I’ve been playing around with using the Myths and Legends podcast to bring in some interesting cultural aspects of certain civilizations we study, but having students create their own spin on or use original stories they are able to research and tell would be even better. Both digital storytelling and video production teaches students so much about marketing, social media etiquette and how to present yourself on camera and in voice, all relevant skills they need with the emerging technology booms.

My favorite assignment:

And last but certainly not least, my favorite assignment for this class. I think I would have to say that my favorite assignment was designing images to use. I have really struggled with creating new images and documents to use in my own classroom. There is so much out there, and to me reinventing the wheel seems pointless most days, but the longer I teach, the more I realize that I can add in new images, technologies, games, projects, and expectations for myself and my students through the use of technology. As long as I am researching and learning, growing and continuing to ask questions; I am able to continue to make myself a better teacher for each group of students I encounter.


I have thoroughly enjoyed this semester and the time spent learning with my classmates. I can’t wait to try out the things I’ve learned this summer!

IMG_4959

EDM 510-Digital Assessment Tools

Let me just start out saying that I’ve had a love/hate relationship with digital assessment tools. On the one hand, I LOVE how much easier they make my life. Answers are graded for me and students are engaged in learning, but they do have some drawbacks. Often they are cumbersome to create, ones like Kahoot get the students too rowdy for my liking, and since my school is not 1to1, we often struggle with students sharing answers. Thankfully we were given SO MANY options for new ideas on digital assessments this week in class. I decided to share two of my favorites here with you.

First up is one I learned about this year from a teacher Instagrammer. Quiziz is incredible. It broke me of my strong dislike of online quizzes like Kahoot. (Nothing wrong with Kahoot, its amazing and I love their new upbeat music, but it often got my students more riled up than prepared for a test or able to quiz effectively without distractions). With Quizizz, I can mute the sounds and that makes a HUGE difference. Other positives are that students go at their own pace and they can see their mistakes. It is only multiple choice questions, BUT here is the kicker – my MOST FAVORITE PART of it – you can import single questions from other teachers’ quizizzes. You just search the topic and pick and choose what you want to include in your own. I love this feature since it solves my dilemma of having to type in questions and answers to all of the questions I want added. I can make a 50 question review in a snap or I can base quizzes off where my students are and be done quickly without worry if I was rushed in typing and creating. Truly amazing.

The other assessment tool I looked at was Socrative. With this website, you are able to create quizzes for students in the format of multiple choice, true false, and short answer. I love the ability to change up your questions for students. I decided to use this option for the PreAP class that I am working on this year as a means for reading checks. I entered a few questions for the first chapter and left it as a short answer. It was very quick and easy. You are able to separate students by rooms and download reports, which makes using this tool easy to grade and record information. I want to pilot it with a large group of students before I give it my full review, but I am excited to try this one this year with my new group!

*For my EDM class, I posted my quiz links in the forum. 🙂

IMG_4959

EDM 510 – Lesson Deployment

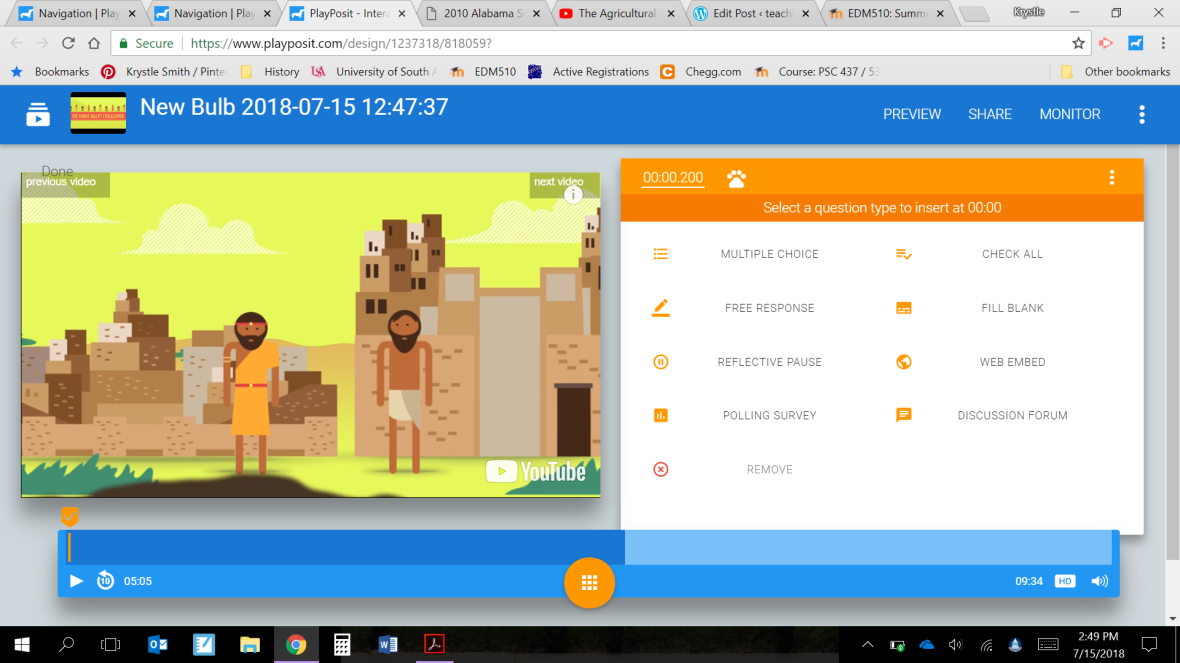
I am obsessed with this program. I will probably use this more in my class this year than any other product. I love using videos in class. When a topic or lesson is hard to visual or connect with, I find that giving students a video with visuals and someone breaking it down for all of them is incredibly helpful, but alas, we often lose them. I am almost 30 and I get easily distracted watching videos. I am not a fan of worksheets that follow along with videos (This is mostly because I am a doodler and I get lost in doodling on my worksheet instead of following along.). So this program, PlayPostIt, allows you to use a video (uploaded or from a website – like YouTube) to input various functions. Here’s a screen shot of the options I was given with the basic, free membership.

playpostit SS

It was very easy to navigate and even allowed me to trim parts of the video I did not need (like John Green talking about skooldleypooping). There is so much that you can do with this program. It is a great way to check for understanding, have students think deeper on an issue and even work together to think about what they are watching. I think every subject and grade level could benefit from this type of video/question inclusion. Even at the younger level, teachers could have students work in a group or as a whole class and help them answer the questions. I know I’ll be incorporating it a lot throughout this year. I really didn’t come across anything difficult with it. It has the ability to add students and check grades, so I am sure that will take some troubleshooting with students in the room, but isn’t most classroom tech like that?

Here’s my example that I will be using when we discuss the agricultural revolution. I also have a video I like to play from Mankind: The Story of Us that the History Channel created that is great at explaining the implications of the agricultural revolution. Feel free to try the questions, it won’t save your answers in this mode.

https://www.playposit.com/share/1237318/818053/Agriculture-Revolution-CC

IMG_4959

EDM 510 – Image Creation and a Tutorial

This week for class we learned about creating images for class. One of my goals this year is to create more products for my classroom, so these assignments were fun to play around with.

Welcome Graphic:

My first product I created was a Welcome Letter to my students. Each year I like to have a graphic design inspired syllabus. Last year’s syllabus included many design elements that I worked very hard on, but since I am teaching a Pre-AP course this year, I wanted to create a more streamline syllabus with information on the topics we will be covering this year. This letter allows my students to have a quick reference sheet to refer back to on grades, tech policy, classroom expectations, and how to reach me. I used the website Canva to create this product – check out my screen recording at the end for a tutorial! This graphic falls under several categories, but I would call it an organizational poster. While this won’t be hanging on my wall in my classroom, students will keep a copy in their binders to refer back to.

Check out my Welcome Graphic here.

History Job Chart with Application:

My next project was one that I have been processing for a few weeks. I saw an Instagram teacher post about using science job terms in her classroom as “houses” like in Harry Potter. While I am a HUGE Harry Potter fan (See my post on Which Harry Potter Professor You Are), I do not have the energy to keep up with house points, themes, and designs. So instead I decided to use the ideas behind the post to create history jobs that relate to group work. For this graphic, I used PowerPoint. You can change slide size to paper size, and create any type of product you would like. Each of the jobs listed on the first page correlate to areas we will study for each topic. Students have the ability to apply for jobs they think they would do best, but ultimately, I will chose their role so all groups are even. I would consider this graphic an interpretive chart. The history based jobs are used to help students interpret the responsibilities required of them for each job.

Check out my History Jobs Chart and Application here.

Compass Rose Partners:

My last graphic I created was one that I’ve been wanting to use in my classroom, but could not find one I liked. After playing around with Canva, I decided I could make one for myself. For this graphic, I used the website Canva again. I also did a tutorial on it that I post about below. Whenever you ask your students to pair up, you usually get most of your students looking around and then doing very little work. With compass rose partners, each student selects a partner for each of the four directions on the compass. The teacher can select which partner students pair up with depending on which direction they tell them for an assignment. I would classify this graphic as a realistic drawing of a compass rose.

Check out my Compass Rose Partners here.

Screencast of Canva

For my screencast, I used ScreenCastify.com. It was really simple to use and it has a Google Chrome extension. I just clicked a button and selected what I wanted to show on my recording. I then spoke into my microphone and recorded how I created my Compass Rose Partners. It did go over the 3 minute limit, but there are so many amazing features to the tutorial I did on Canva. ScreenCastify was really simple and I would love to use it more as I add more digital elements to my classroom. Instead of redoing a lesson on a new website or app each period, I could create a screen cast of my first class and share with the rest that day. This would allow me to walk around and help troubleshoot as they learned. It could also be very helpful for absent students to help them keep up with the lessons they are missing.

Check out my ScreenCast of how to create teacher products below!


IMG_4959

EDM510 – Video Creation

For this assignment, we were asked to create a video to use in education. I really wanted to create an introduction video to my class using the introduction lesson I got from Mr. Roughton’s website on why history is an important subject, but the time and credits would not be accomplished within the week’s timeline. {I hope to push this intro back until the end of the month, where I can get into my room and film myself and some portions of work to use in this video.}

So instead, I decided to create another video that I needed for a program I am over this summer. This will be my second year directing Bulldog Camp. Bulldog Camp is our annual bridges program where upcoming 6th graders are given the opportunity to spend two days at our school learning about what classes are like, how P.E. runs, and what to expect from teachers. They also play team building games, get school supplies, and get to meet 8th graders from various sports’ teams and clubs.

Once I decided what I wanted to create my video on, I needed to lay out a plan. I decided as an intro to our incoming bulldogs, I wanted to include rules, an idea of some things offered at our school, and pictures of the teachers participating in Bulldog Camp this year. I also included some film from one of our pep rallies to give the students a chance to see what it all looks like in motion.

To create this video, I used the app Viva Video Pro. I have used this app on multiple occasions in the past with a makeup business I ran, so I was familiar with it. You are able to add photos and videos of your own, and the app has music within it you are able to use. You are also able to add animations, text, and clip art.

Many of the pictures I used within my video were created on one of two apps. I created the rules on an app called Legend, and I created the pictures on what our school has to offer within Word Swag. Both of these apps are invaluable for creating pictures with text to catch students’, colleagues’, or PD attendees’ attention.

Once I created all my slides, I just added them into the app in the order I wanted, added music I liked, recorded my voice over the parts that I wanted to include, and made sure all the timing was correct. Once I was done, I was able to export the video to my phone gallery and upload it to YouTube from there.

I think the next time I create a video (hopefully for an intro to my class at the end of this month), I would like to spend more time making it cohesive and themed. I struggle to find backgrounds, fonts, and pictures to use that are copyright free. I would also like to work more on using video creation with students. With my Bulldog Camp position, I want to be able to create a team of students who help me plan and market our camp to incoming 6th graders each spring. Part of that vision includes having students create a “commercial” for our school and the camp. I hope to work on that this upcoming year!

So, without further ado – here is my introduction video:

Welcome to Bulldog Camp 2018!

EDM510: Digital Devices and Web 2.0

This week, we had two assignments, both of which helped to focus my attentions on tools and resources that I can use to help with clutter in my classroom, and with allowing my students to do much more interacting with technology in class rather than just using it for research.

First up, we were led to look into using different resources for digital documents, spreadsheets, presentations, and such. I’ve used Google products since college on and off and hope to use them more this school year within Google Classroom. Our district uses Microsoft 365 to create and share information, so I have become more familiar with using the digital versions of Microsoft. Some other options we were told about were LibreOffice and OpenOffice. I decided to download and try out LibreOffice, mostly because it was French for book… After playing around with LibreOffice, here is my review:

LibreOfficeReview

The next assignment this week was to read about Web 2.0 and 3.0. After reading the chapter in our textbook about these tools, I realized that I’ve been using Web 2.0 some this past year in class with some great results. If you’re interested in learning more about Web 2.0 and 3.0, check out my Buncee.

I’ve used Buncee once in my class this past year, and I wanted to play around with it some more. On Buncee, you can create boards with text, animations, pictures, links, and YouTube videos to share information. Students can create their own Buncee and use open links to share with other students. To create my Buncee, I started with the questions posed to us on the topics of Web 2.0 and 3.0 and their uses in education. I got all of my information for my slides from the textbook. I decided on a gears/tech theme for the background of my slides to keep it simple, but then wanted to include the ideas for education within some gears. After being used to editing text and graphics within PowerPoint, which is fairly easy, manipulating the graphics with the text was rather frustrating. If there were many parts to my information, I wouldn’t want to go all out on these slides. Otherwise, the fonts, colors, and graphics were helpful and added to the overall visual aspect of the project. I attempted to use it this year to share information on Medieval Japanese feudal society. Each Buncee slide had a title, picture, and YouTube video for students to learn from, but YouTube is a blocked website on MCPSS, so it did not work out as planned. I do see some other options for using Buncee in class and for educators. Students could create Buncees in groups with each student completing a slide of information and responding to each others’ slides within groups, and then sharing entire boards with other groups. Educators could use these boards to share content in a flipped classroom, for students to review material and view videos before the lesson. Overall, I do like Buncee and want to try to use it more in my classes this upcoming year.

EDM510 – Learning Theories Matrix

Back to the learning theories we go. My professor mentioned that we would be visiting these theories again even though we have covered them innumerable times in our undergrads, for those of us who have bachelor’s in Education, and even more so for those of us obtaining our master’s in Education. So I find myself here again with Piaget and Slavin thinking about how my classroom can better reflect psychological studies of how we learn. For this course, instead of just reviewing the material for each concept, we were tasked with creating a matrix of information on each of the four learning theories: Behaviorist, Cognitivist, Constructivist, and Social Psychology.

Here is a link to my matrix: LearningTheoriesMatrixKSmith

My first step in creating this matrix, was to google what a matrix looked like. I am fond of using PowerPoint to create my digital work, so I attempted to follow online directions from Microsoft to create a matrix in “SmartArt.” This attempt left me with very little room to add in my information, and some very strange shapes and colors. Once some students had posted their examples on our forum, I decided to stick with my trusty table, which I think is the same idea as a matrix. Once I figured out that I could use something that I was familiar with, the rest was formatting my information.

While gathering information about my matrix, I realized that some of the information I was already using in my classroom. After teaching 3rd grade my first year, I realized quickly that while extrinsic rewards often got an immediate response, those rewards were usually expensive and didn’t create a lasting impact or help motivate my students to create their own learning experiences. After speaking with a colleague during my third year teaching, first year in public school/middle school, we decided that even in middle school students needed to learn about the benefits of intrinsic rewards. The joy of a job well done, the pride in a completed task, things that cannot be held or used up. After implementing these ideas into my lessons, I’ve seen some positive results from Skinner’s studies on behaviorist theories. Thinking of how and when to include technology and the use of technology on our dopamine receptors creates some interesting questions on behaviorist theories and technology.

The other three theories really go hand in hand with how I see my content area. As a history teacher, most people would expect boring book work, but I disagree. History teaches us about ourselves and helps us place ourselves in the grand scheme of the world. It, along with science, is a great content for students to be able to respond, think, analyze, and collaborate to understand history and how it relates to us in modern times. The theories of cognitivist, constructivist, and social psychology allow for history teachers to integrate technology that build up a student’s understanding of their past and how to shape their own future. I did gather information on what a constructivist classroom would look like from this website. Otherwise, I used the textbook to build my information.